This might be the most duh thing I’ve made publicly available (you should see the stuff I keep secret…), but when I reached the end of the Google provided Mirror API/Glass quickstart tutorial, I looked for the next page of explanation. There was no next page. What I was looking for was something that described the webapp just launched. Maybe it isn’t necessary for anyone else, but it felt like an omission to me. So, here’s my continuation of the quickstart tutorial docs…
(reference: https://developers.google.com/glass/quickstart/python)
Here’s a screenshot of the bottom section of the page that gets launched from the quickstart code:
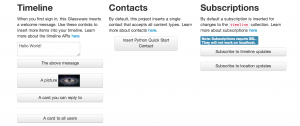
You may be looking at this image and thinking “well, that’s pretty self-explanatory given the h3’d titles over each section”, and you may be right. That wasn’t the problem here though. The problem was the gap between the launch of the webapp via appengine tool invocation and then a review of what a powerful tool this webapp is.
So, how does this help you?
This webapp allows you to exercise all of the Mirror API functionality without sullying yourself with any development. Of course, we’re in it for the development, so what we’re seeing is the result of the sample project. Play with it a bit. You can use the timeline tool to add items into your timeline. Those items will (magically) appear in the timeline section across the top of the page (or in your Glass). Once you get done fiddling around there, you can dig into the code.
First, open up /templates/index.html and walk through the html to see the invocations of the POST methods for the timeline form area:
<form action="/" method="post">
 <input type="hidden" name="operation" value="insertItem">
 <input type="hidden" name="message"
 value="A solar eclipse of Saturn. Earth is also in this photo. Can you find it?">
 <input type="hidden" name="imageUrl"
 value="/static/images/saturn-eclipse.jpg">
 <input type="hidden" name="contentType" value="image/jpeg">
<button type="submit">A picture
 <img src="/static/images/saturn-eclipse.jpg">
</button>
 </form>
Of note here is that the form POST’s to a single endpoint (“/”) and passes along the desired action as a parameter (hidden in the form, named “operation” in the form shown). Okay, its still just a form — nothing bleeding edge there.
The python code that handles this routes all of the POST’s to /. Let’s dig into the python code. First, open up the main.py file. This has most of its meat hidden away in subfiles, but what is done here is to register all of the routes that this webapp handles. For example, the oath handler provides code for the routes ‘/auth’ and ‘/oauth2callback’.
Next we’ll open up the main handler file /main_handler.py. Look at the post method:
@util.auth_required
 def post(self):
   """Execute the request and render the template."""
   operation = self.request.get('operation')
   # Dict of operations to easily map keys to methods.
   operations = {
     'insertSubscription': self._insert_subscription,
     'deleteSubscription': self._delete_subscription,
     'insertItem': self._insert_item,
     'insertItemWithAction': self._insert_item_with_action,
     'insertItemAllUsers': self._insert_item_all_users,
     'insertContact': self._insert_contact,
     'deleteContact': self._delete_contact
   }
   if operation in operations:
     message = operations[operation]()
First up, you see the decorator there @util.auth_required. Open up the corresponding file, util.py, and check out the auth_required method there. The simple text translation of the code found there is: is user authorized? Yes, then carry on. No, forward request to /auth for authorization. This is in place so that all requests to the app will pass through authorization.
Back to post method source, you can see the map of the form’s “hidden” operations to actual method invocations in the source. These methods are then invoked at line 117,
message = operations[operation]()
So if we posted a form that had the “operation” parameter with the value “insertItem”, this code would invoke it as
message=operations['insertItem']()
which would REALLY be, after the dict lookup:
message=self._insert_item()
From there, you can dig into how _insert_item() handles the data and interacts with the user timeline. My notes appear in BLUE in the code below.
def _insert_item(self):
  """Insert a timeline item."""
  logging.info('Inserting timeline item')
  body = {
    'notification': {'level': 'DEFAULT'}
  }
  # self.request is the object holding the http form data POST'd
  if self.request.get('html') == 'on':
    body['html'] = [self.request.get('message')]
  else:
    body['text'] = self.request.get('message')
    media_link = self.request.get('imageUrl')
  # here we check if you passed along an image or if just a plain ol' insert
  if media_link:
    # lets go out and grab the bytes of your media so we can stuff 'em in timeline
    if media_link.startswith('/'):
      media_link = util.get_full_url(self, media_link)
    resp = urlfetch.fetch(media_link, deadline=20)
    media = MediaIoBaseUpload(
         io.BytesIO(resp.content), mimetype='image/jpeg', resumable=True)
  else:
    media = None

 # self.mirror_service is initialized in util.auth_required. <- existing comment
 # but important in that this does a LOT of stuff -- see below
 self.mirror_service.timeline().insert(body=body, media_body=media).execute()
 # this is the message spit back to webapp
 return 'A timeline item has been inserted.'
The one line
self.mirror_service.timeline().insert(body=body, media_body=media).execute()
does a number of things. First, we grab the mirror_service that we initialized as part of our authorization. From that mirror_service, we get an instance of a timeline. Into that timeline, we build an insert object that contains the body that we built in our method (including any media that we sent along). That might be a bit confusing as insert is a common verb used as a method name for putting objects into collections. Here it is an object. That’s why the last thing we have to do is call execute() on the insert object to have the data sent to the timeline. (I didn’t dig into the code but I suspect that’s what happens there).
Next up — our first kinda app: a simple canned powerpoint presentation that you can push subscribers.